Migrating Your Data from Docusign
Use this page if you are moving your signed envelopes into Propper. Docusign Connect sends envelope events to a webhook address that belongs to your organization, and Propper turns them into agreements — both the envelopes you have already signed and the ones you sign from here on.
Moving your integration code rather than your data? That is a different job — see Migrating Your Integration from Docusign.
What: Keep your Docusign documents synced to Propper during (and after) migration.
How it works: Docusign notifies Propper whenever an envelope is signed, declined, or voided. Propper receives the notification and imports the envelope as an agreement.
Why use this: You get a complete record of all signatures in Propper without manual effort, and your existing Docusign workflows keep working during the transition.
- Migrating Your Integration from Docusign — API migration guide for moving your integration code to Propper
- Sign Webhooks — Configure outgoing webhooks from Propper Sign
- Templates — Create reusable signing templates
Two routes your envelopes can travel
This is the single most important idea on the page, and getting it wrong is the most common reason a migration looks broken when nothing is wrong at all.
A Connect configuration receives events from the moment you save it. Envelopes signed after that arrive on their own, with nothing further for you to do. Envelopes signed before that are invisible to Connect until you explicitly republish them — and a great many customers configure Connect, wait, see nothing appear, and conclude the integration has failed.
| Route | Which envelopes | What you do |
|---|---|---|
| Ongoing | Signed after the configuration exists | Nothing. They are delivered automatically. |
| Historical | Signed before the configuration existed | Republish them deliberately — see Importing your historical envelopes |
Both routes arrive at the same webhook address and are processed identically. They differ only in how the envelope gets there.
Propper recognises an envelope it has already imported and updates that agreement instead of creating a second one. If a batch comes up short, republish the range again.
Before you start
- Docusign administrator access — Connect is configured in Docusign Admin.
- Propper Sign admin permissions in your Propper organization.
- The Docusign Connect feature on your Docusign plan. Connect is not included on every plan, and enabling it is a request to your Docusign representative that can take a few days. Confirm this first — it blocks everything else.
It is also worth deciding up front what is actually moving. Templates, historical completed envelopes, live in-flight envelopes, and your API integration are four separate migrations, and whether you are cutting over completely or running both systems in parallel changes which of them matter.
Two settings you cannot change later
On the Docusign configuration form, Data Format and Event Message Delivery Mode both carry the notice "This cannot be changed once the configuration is saved." This is not a warning Docusign is being cautious about — the fields are genuinely locked after the first save.
Set them to:
- Data Format:
REST v2.1(JSON) - Event Message Delivery Mode:
Send Individual Messages (SIM)
Choosing anything else means deleting the configuration and starting over. It also closes off the fastest route for importing your history, because Docusign's bulk republish API accepts only the SIM model.
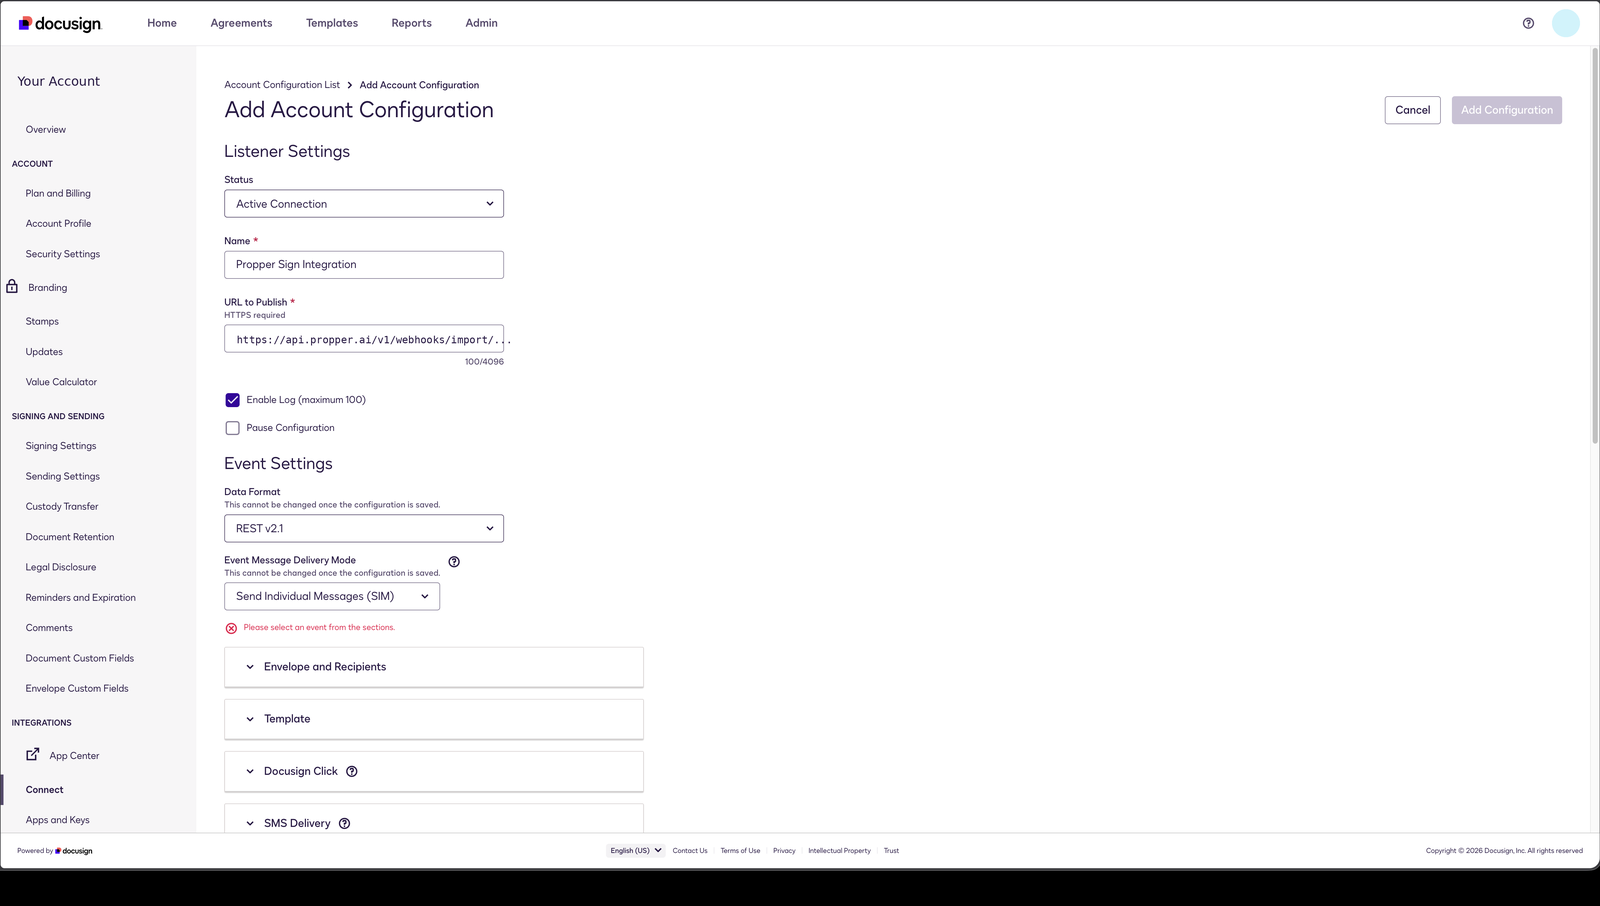 The configuration form in full — URL to Publish above, the two permanent fields below.
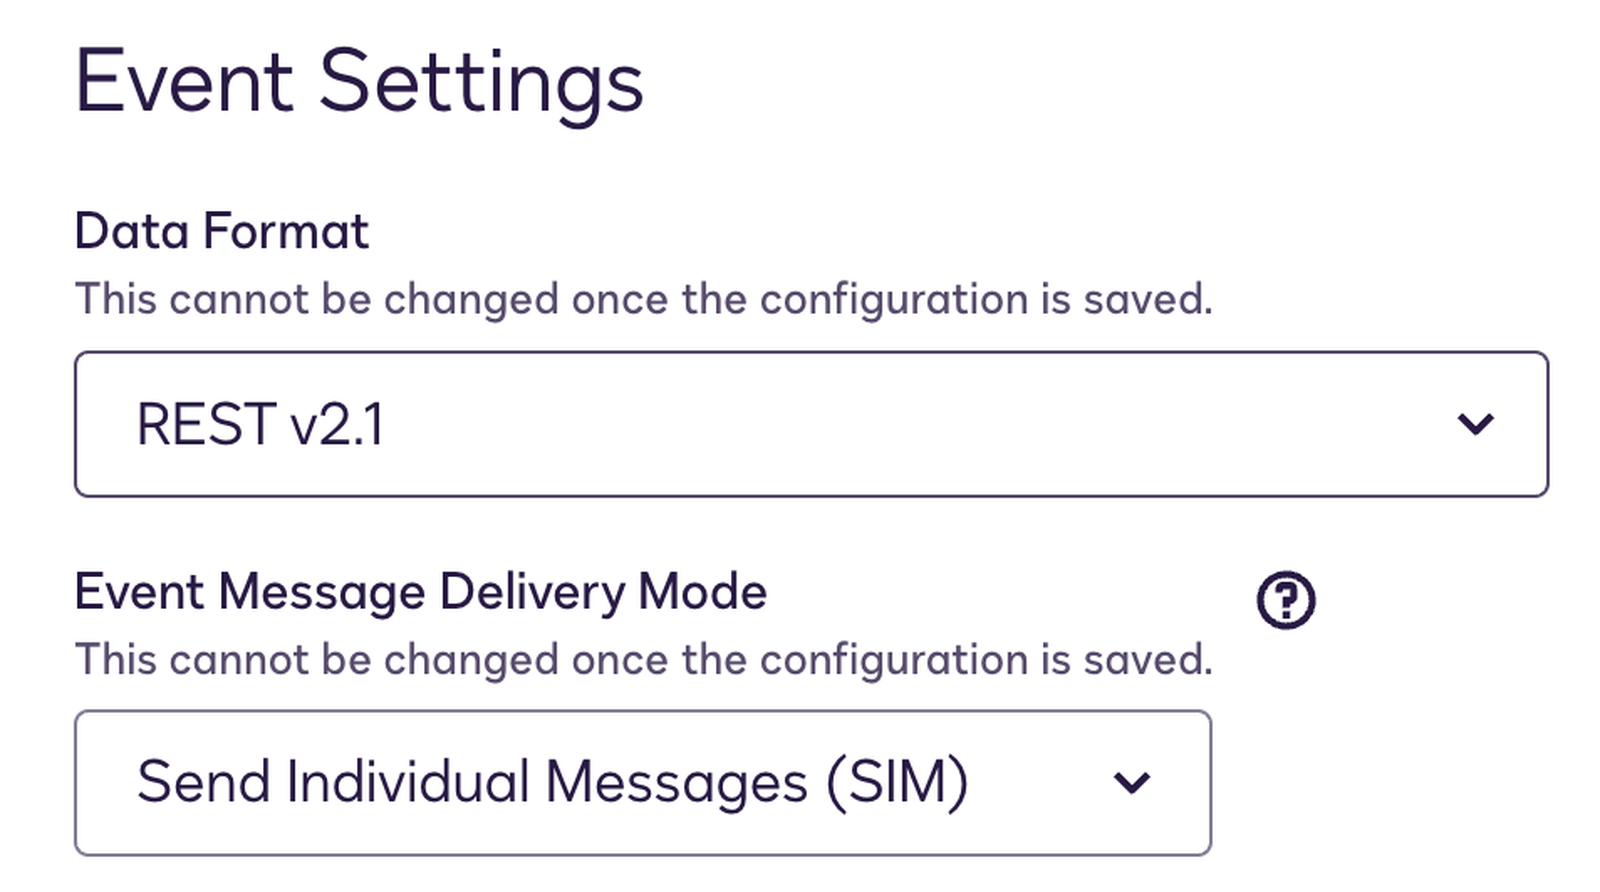 Data Format and Event Message Delivery Mode — both permanent once saved.
Setting up Connect
Step 1 — In Propper: get your webhook address
From the Organization Dashboard, open the DocuSign Connect card. (You can also go straight to the settings page if you prefer a direct link.)
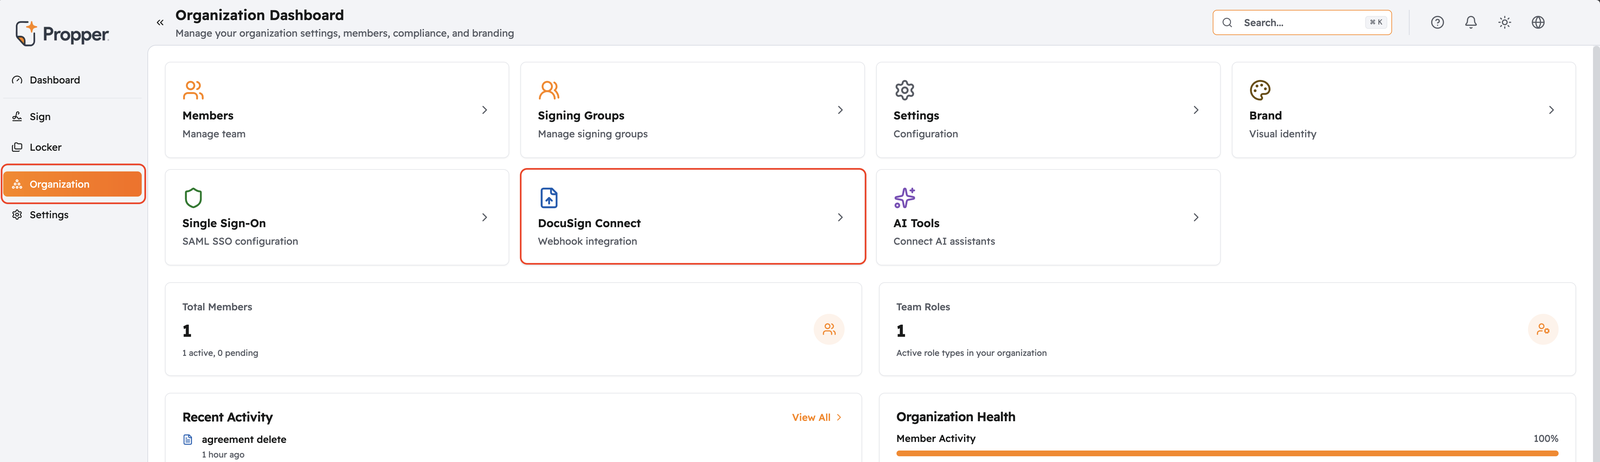 Organization Dashboard → DocuSign Connect.
The page issues a webhook address unique to your organization. Copy it — you will paste it into Docusign in Step 3.
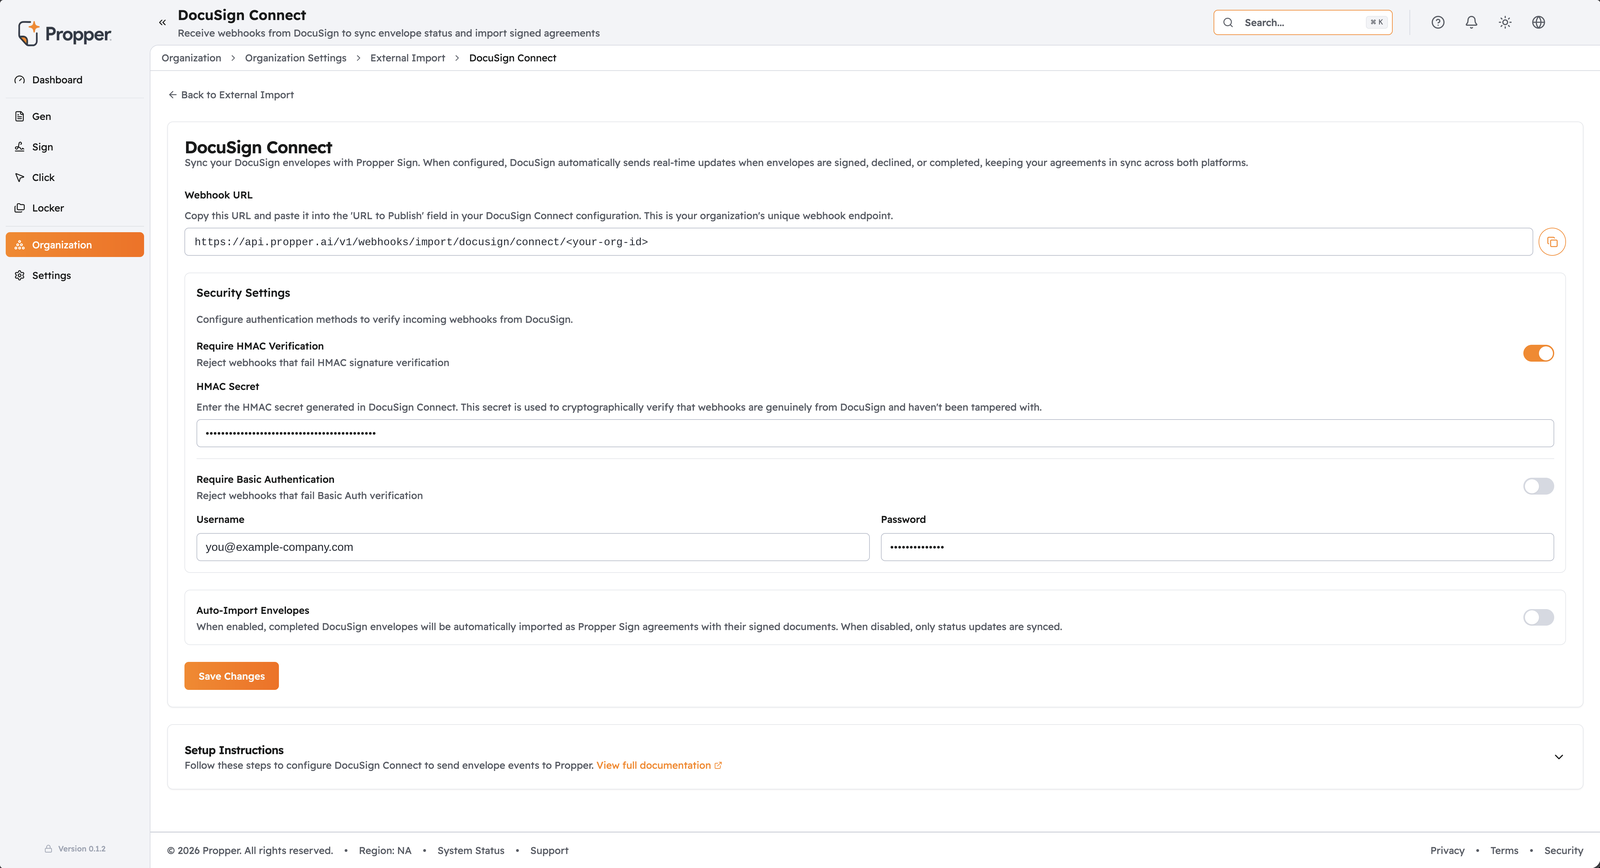 Propper → Organization Settings → External Import → DocuSign Connect.
This screen resets Auto-Import Envelopes to off whenever neither HMAC nor Basic Auth is configured. Configure a verification method and save first, then come back and enable Auto-Import — otherwise the toggle silently reverts and you will not notice until nothing imports.
Step 2 — In Docusign: create a Connect key
You need an HMAC key before you can ask Docusign to sign its webhooks, and the checkbox that turns signing on cannot be ticked until that key exists.
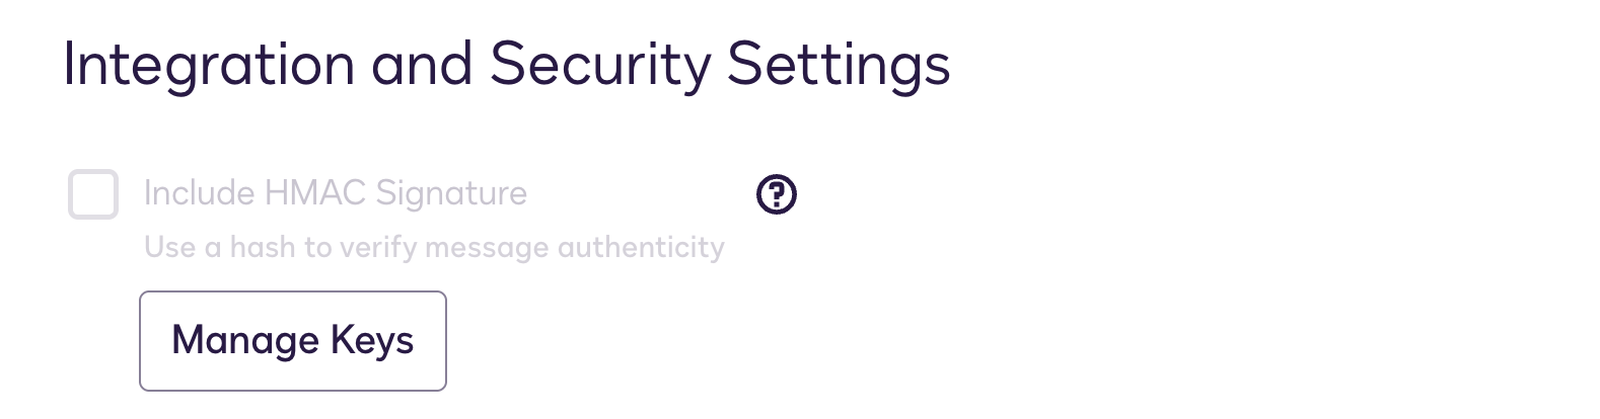 Include HMAC Signature stays greyed out until a Connect key exists.
Create one in Docusign Admin under Connect → Connect Keys → Add Secret Key, then paste the value into Propper's HMAC Secret field.
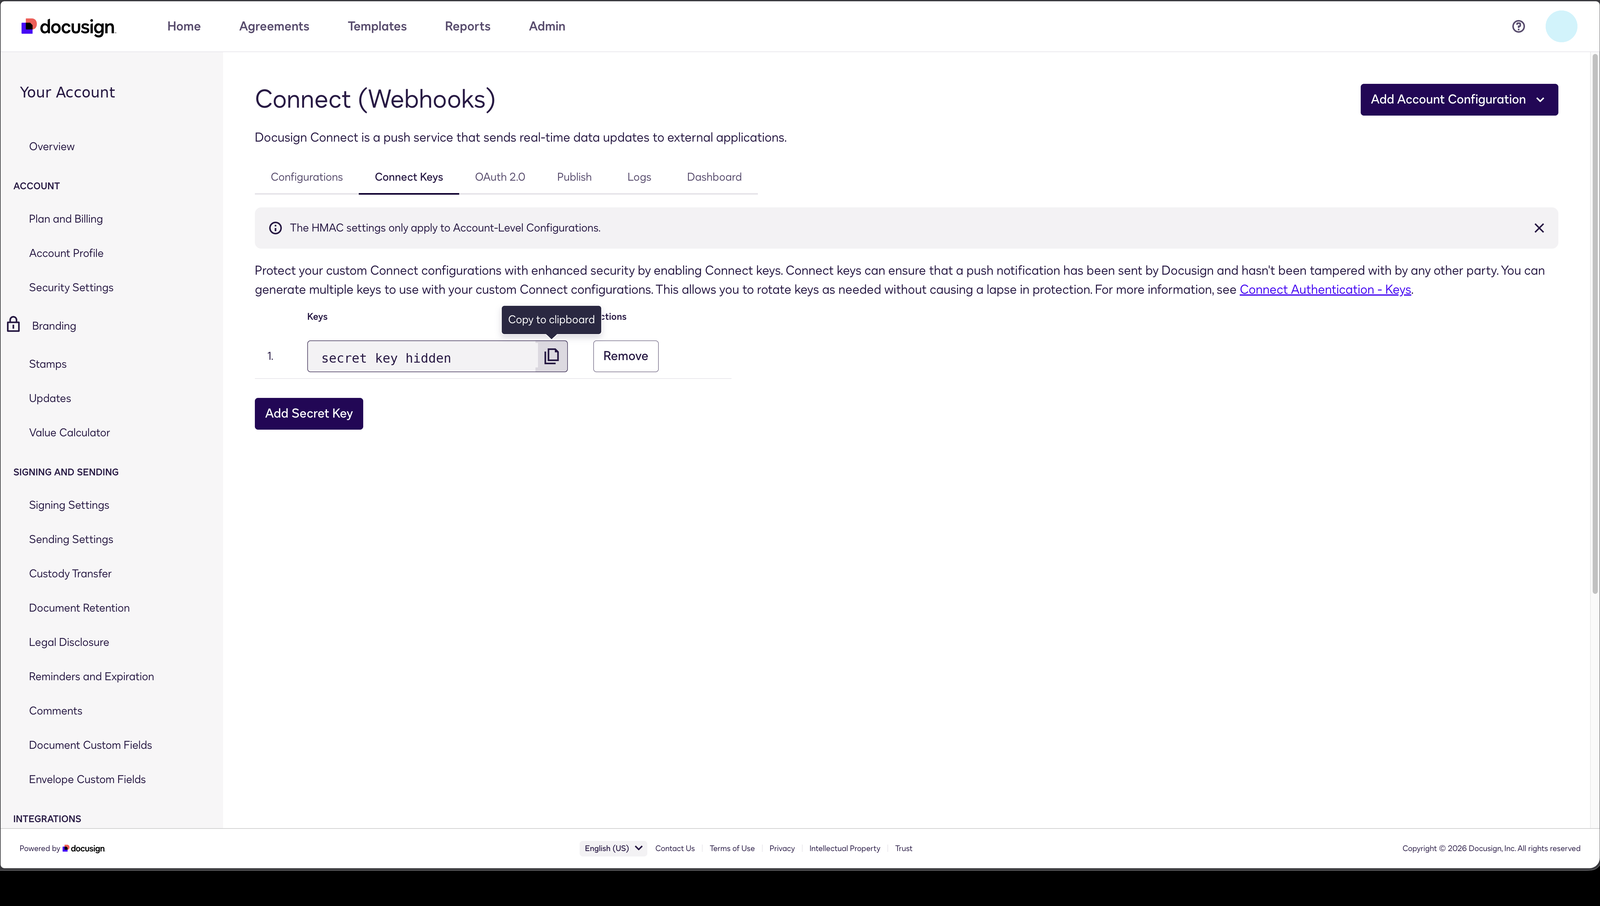 Connect Keys → Add Secret Key.
The Connect Keys tab states it plainly: the HMAC settings apply to account-level configurations only. A user-level or envelope-level configuration cannot be HMAC-signed. Because we recommend HMAC, build this as an account-level configuration — which is what Step 3 does.
Step 3 — In Docusign: create the configuration
In Docusign Admin ↗, open Connect. It is its own item under the Integrations group in the sidebar — it is not filed under "Apps", which is not obvious.
Click Add Account Configuration, then choose Custom.
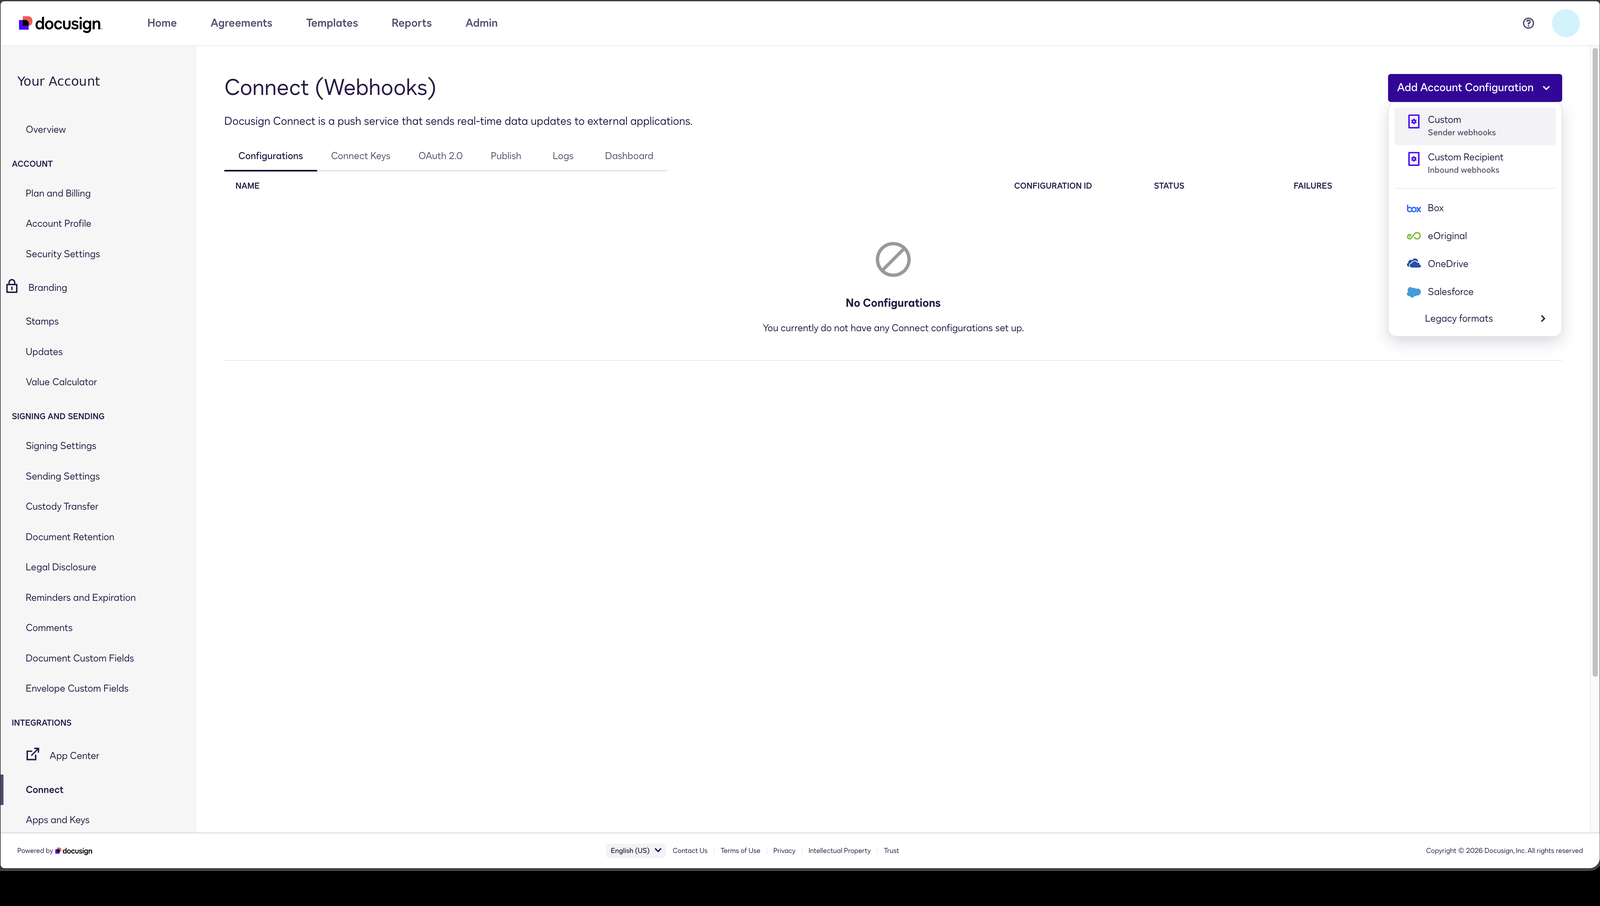 Docusign Admin → Connect → Add Account Configuration → Custom.
The menu offers both. Custom is the sender webhook you want. Custom Recipient is a different, inbound configuration — choosing it produces no error and no events, so the mistake is silent.
On the form:
- Paste your Propper webhook address into URL to Publish (HTTPS is required).
- Set Data Format and Event Message Delivery Mode as described in Two settings you cannot change later — this is your only chance.
- Leave Enable Log on. It is how you diagnose a delivery that never arrives.
- Enable Require Acknowledgement.
Step 4 — Choose your events and payload contents
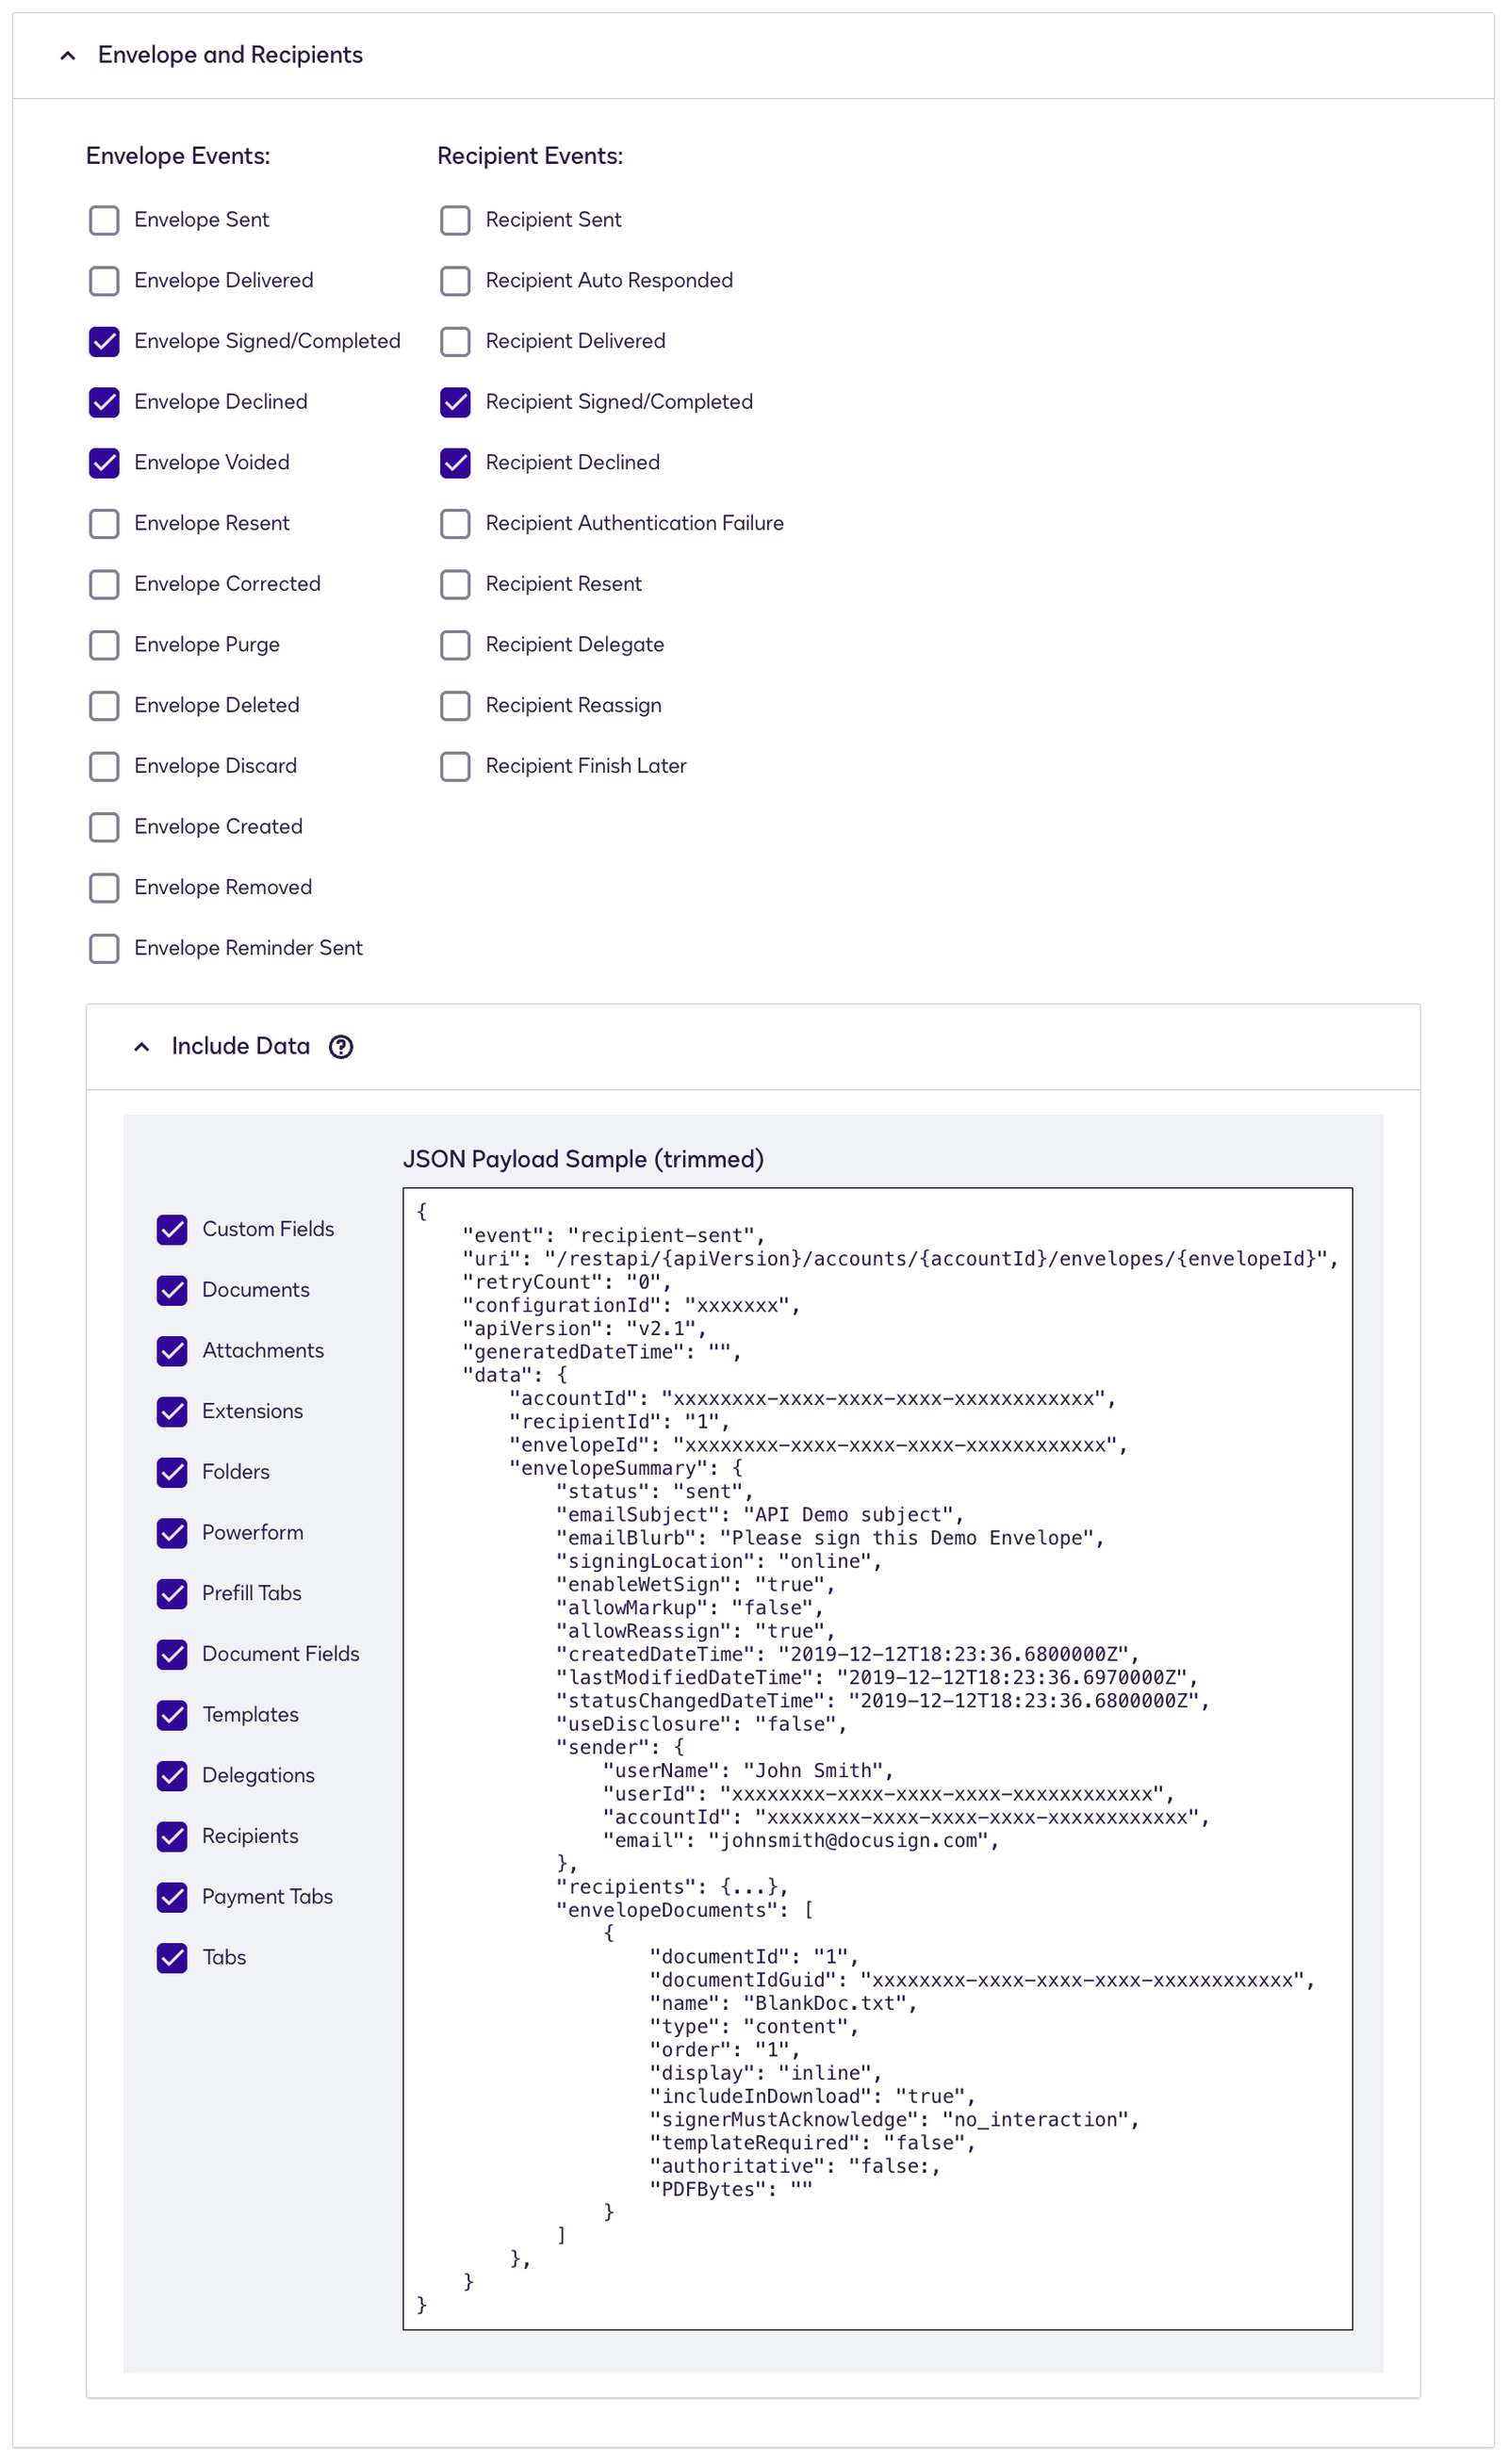 Event selection and the Include Data panel.
Envelope events (agreement-level status):
| Event | Purpose | Required? |
|---|---|---|
| Envelope Sent | Track when envelopes are sent for signature | Recommended |
| Envelope Delivered | Know when all recipients have received the envelope | Recommended |
| Envelope Completed | Import completed/signed documents | Required |
| Envelope Declined | Track declined envelopes | Recommended |
| Envelope Voided | Track cancelled envelopes | Recommended |
Recipient events (recipient-level visibility):
| Event | Purpose |
|---|---|
| Recipient Delivered | Track when each recipient receives the envelope |
| Recipient Completed | Track when each recipient completes signing |
| Recipient Declined | Track when a specific recipient declines |
For a migration, the terminal states are what matter: Envelope Completed, Declined and Voided, plus Recipient Completed and Declined.
Propper stores your signed PDFs only when the payload actually carries the document bytes. If Documents is left unchecked in Include Data, your envelopes still import as agreements — with no signed PDFs attached. The import reports success either way, so this is a half-finished migration you will not discover until someone opens an agreement months later and finds it empty.
Tick Documents, and check the rest of the Include Data set while you are there.
| Option | Recommendation | Notes |
|---|---|---|
| Include Documents | ✅ Required | Without it, agreements import with no signed PDFs |
| Include Recipients | ✅ Recommended | Required for recipient status tracking |
| Include Certificate of Completion | ✅ Recommended | Stores Docusign's audit certificate alongside the record |
Documents are Base64-encoded into the payload, so envelopes carrying them are large. If delivery times become a problem, send status-only events for Sent/Delivered/Declined/Voided and include documents only on Completed — the event that actually needs them.
Docusign can also notify you when envelopes are purged, deleted or discarded. Propper handles these by voiding the matching agreement — select them only if you want Docusign deletions mirrored into Propper, which is rarely what a migrating customer expects.
Step 5 — Turn on Auto-Import in Propper
Return to the Propper settings page and enable Auto-Import Envelopes. Any migration needs this on.
The in-product description reads "When disabled, only status updates are synced." That is accurate, but easy to misread. "Status updates" means updates to agreements Propper already has. For historical envelopes with no counterpart in Propper, off means nothing is created at all — you get a record of the event and nothing else.
Auto-Import off is useful in exactly two situations: you send from Propper and mirror into Docusign, and only want statuses kept in step; or you want a deliberate observation period to confirm the plumbing before anything is created. Neither applies to a migration.
| What you get | Auto-Import ON | Auto-Import OFF |
|---|---|---|
| Event recorded in Recent Activity | Yes | Yes |
| Agreement created | Yes | No |
| Recipients and signed documents | Yes | No |
| Status sync of an agreement you have | Yes | Yes — unaffected |
Step 6 — Confirm the configuration is live
Back in Docusign Admin, your configuration now appears in the Connect list showing Active and a running failure count. That is the fastest check that your setup worked.
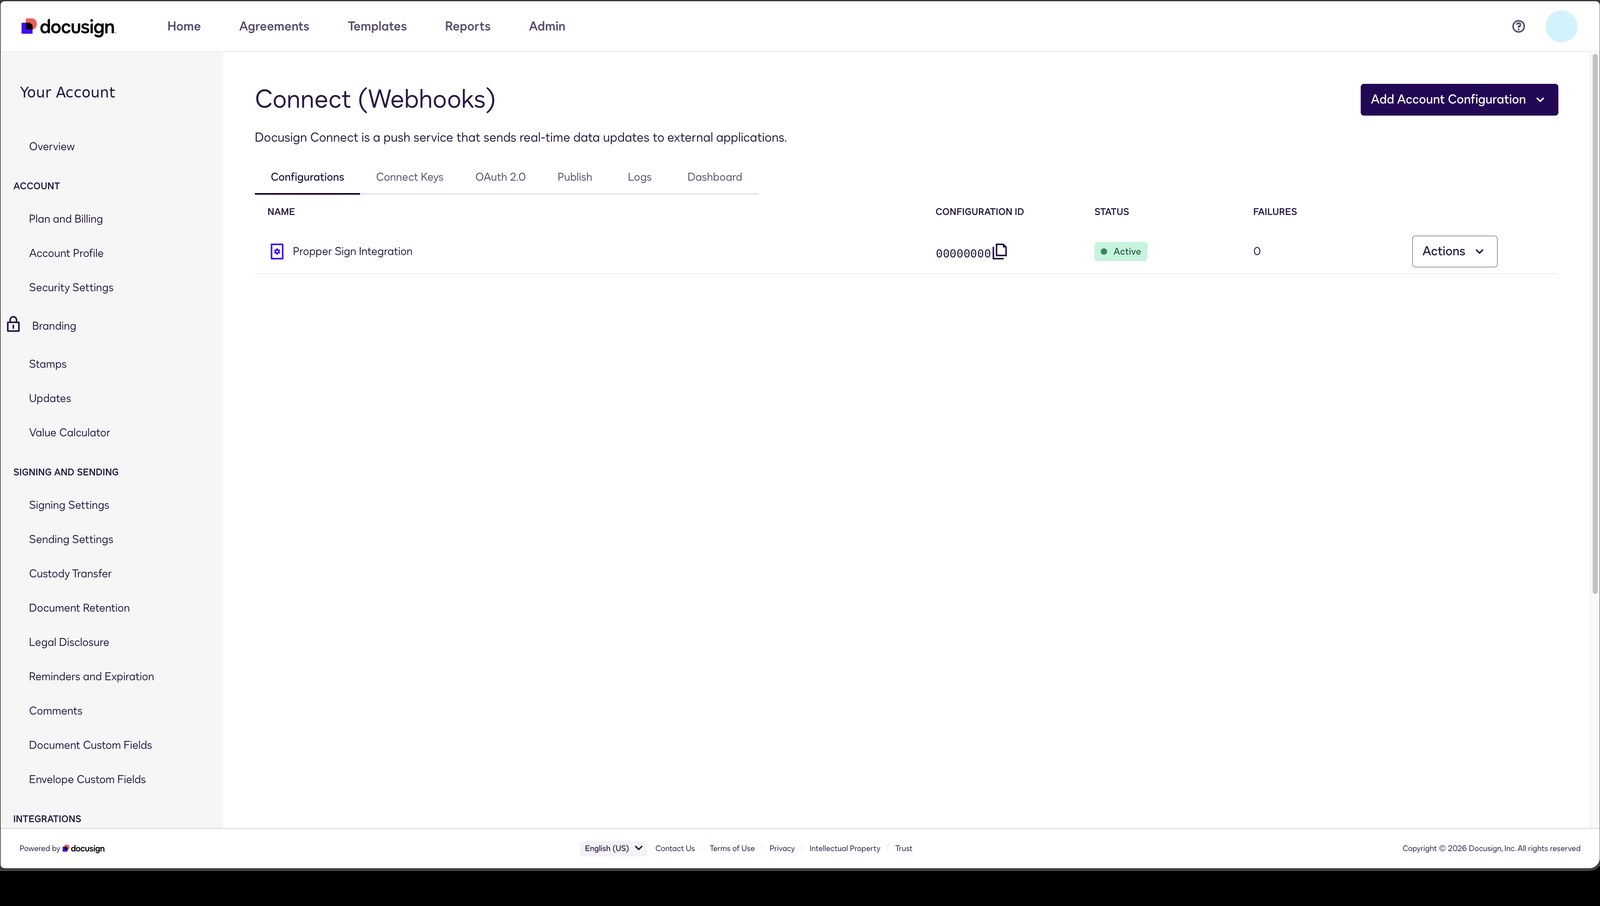 The saved configuration shows Active, a failure count, and the configuration ID.
Note the configuration ID shown here. You will need it if you import your history via the CSV route.
Then send a test envelope end to end:
- Send an envelope in Docusign and complete the signing.
- In Propper, open Organization → DocuSign Connect → Recent Activity.
- Confirm the event arrived with a Completed status, and that the agreement was created with its document attached.
Security configuration
- HMAC (recommended)
- Basic Auth (fallback)
Docusign signs each webhook payload with a key you generate, and Propper verifies that signature before processing anything.
- Create the key in Docusign Admin under Connect → Connect Keys → Add Secret Key (Step 2 above).
- Copy the generated key.
- Paste it into Propper's HMAC Secret field and save.
- On the Docusign configuration, tick Include HMAC Signature — which is now available.
Remember that HMAC applies to account-level configurations only.
Common failures:
| Issue | Solution |
|---|---|
| Secret mismatch | Ensure an exact match — check for trailing whitespace |
| Wrong validation method | Validate against raw request body bytes, before any JSON parsing |
| Wrong secret | The signature header is X-DocuSign-Signature-1. HTTP header names are case-insensitive, so casing is never the cause — re-check the secret |
| Multiple signatures | Docusign may send several signature headers — validate against at least one |
Docusign uses HMAC-SHA256, computed over the exact raw bytes of the request body rather than the parsed JSON. Make sure nothing modifies the body before verification.
Use Basic Auth if HMAC is not available on your Docusign plan, or if you need a user-level or envelope-level configuration that HMAC cannot cover.
- In Propper: enable Require Basic Authentication and set a username and password.
- In Docusign Connect: find Require Mutual TLS (mTLS) or Basic Authentication.
- Tick Require Basic Authentication.
- Enter the same username and password.
Your webhook address identifies your organization, but it is not a credential.
A request carrying neither an HMAC signature nor an Authorization header is rejected and recorded rather than processed. But on a configuration saved with no verification method, the check is presence-only — a request carrying any arbitrary Authorization value is processed as though it were genuine. Configure HMAC or Basic Auth so the credential is actually verified.
Importing your historical envelopes
Everything signed before your configuration existed has to be republished deliberately. This is the actual data migration, and it is the step most customers do not know exists.
In Docusign Admin, open Connect → Publish.
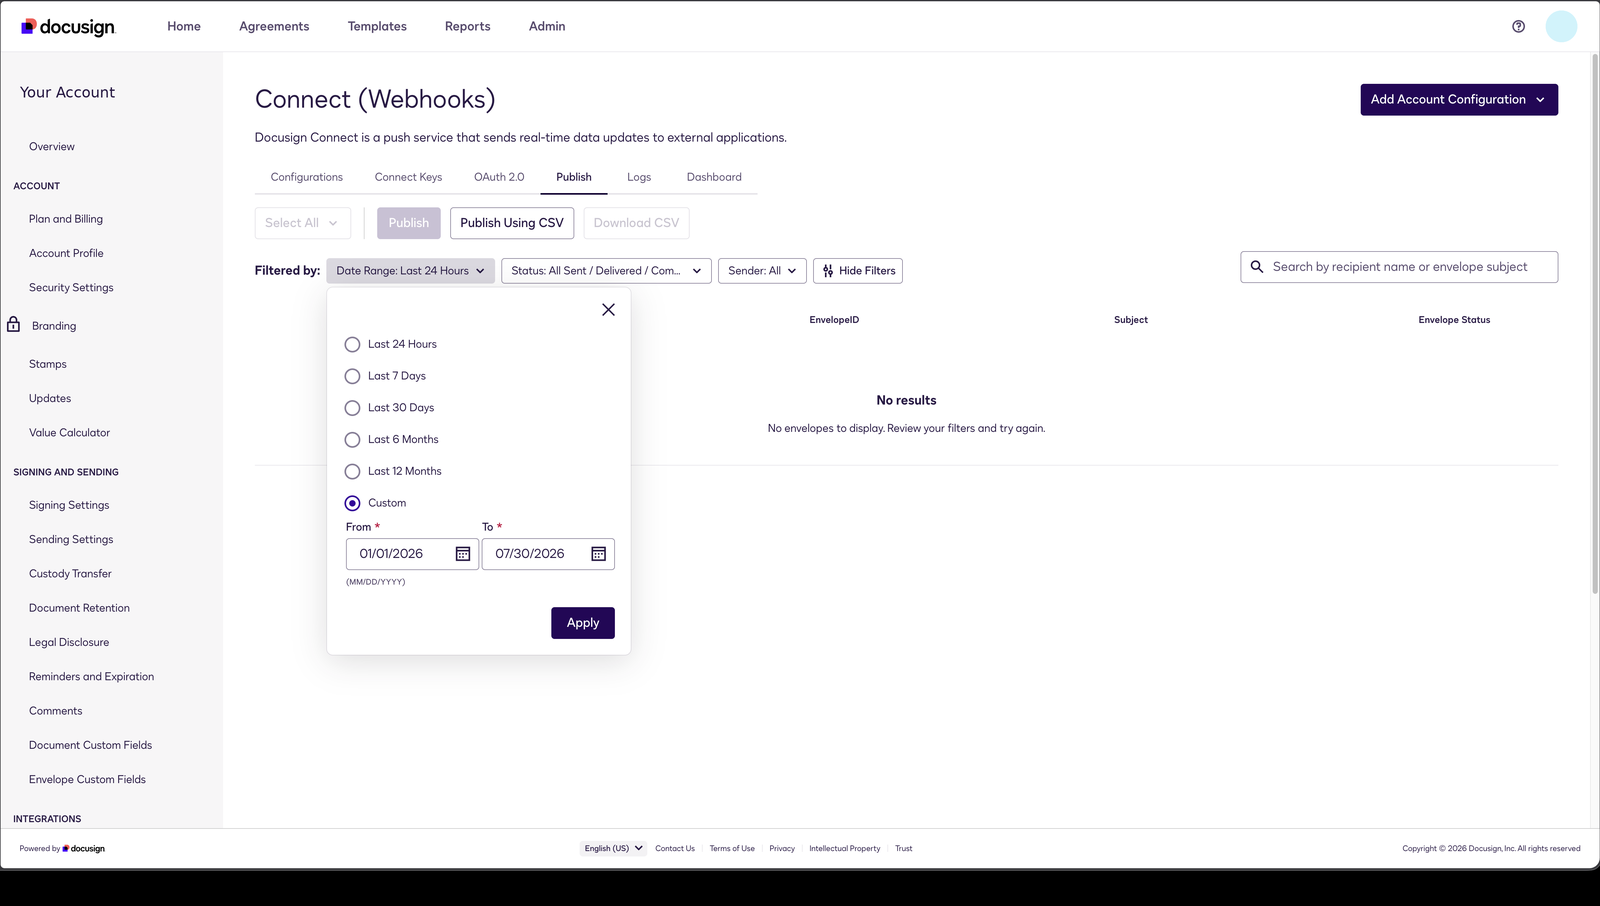 Connect → Publish, with the Date Range filter open on Custom.
Date Range defaults to Last 24 Hours. So a customer opening this tab to migrate five years of history sees "No results. No envelopes to display." and reasonably concludes the integration is broken.
Nothing is broken. Open Date Range → Custom, set From to a date before your earliest envelope and To to today, and click Apply.
The straightforward path
- Set the date range. Date Range → Custom → From a date before your oldest envelope → To today → Apply.
- Check the Status filter. It has its own default, covering a particular set of sent / delivered / completed states. Confirm it covers what you are actually migrating rather than assuming it does.
- Select All, then Publish, and choose the configuration you created in Step 3.
The CSV round trip
Between the simple UI publish and the API there is a middle option that most customers actually want.
Download CSV exports the filtered envelope list. Publish Using CSV takes it back. Use it when the selection needs reviewing, editing, or splitting into batches.
No separate report export is needed. The envelope list the CSV route wants comes from Download CSV on this same page, against whatever filter you have applied. An account-level export carries two columns: the envelope ID and the configuration ID from Step 6.
Choosing a route
| Route | Best for | Limits |
|---|---|---|
| Filter → Select All → Publish | The normal migration, and your first smoke test | Practical UI limits |
| Publish Using CSV | Reviewed, edited or batched selections | ~9,999 envelopes/hour at account level; ~19,999/hour at organization level |
| Envelope Publish API ↗ | Scripted or repeatable migrations | JSON SIM model only |
Stage it, then verify
Publish a small filtered batch first and confirm the agreements land with their documents attached. Only then run the full range.
To check completeness afterwards, Recent Activity carries one row per received event with its processing status, so counting completed rows against your expected envelope count is the fastest check. If you are short, republish the missing range — repeating a republish is safe.
Monitoring and troubleshooting
Open your DocuSign Connect page →
See incoming webhooks, their processing status, and detailed payloads.
Delivery vs processing
Understanding the difference is critical for troubleshooting:
| Term | Meaning |
|---|---|
| Delivery success (HTTP 200) | Propper received and accepted the webhook for processing |
| Processing success | The agreement was updated and/or documents were imported |
Propper returns HTTP 200 once the event is accepted, even if the later processing fails. This follows Docusign's recommended async pattern ↗ and prevents duplicate deliveries. If processing fails, check the log entry for the error and contact support — Docusign will not retry, because we returned 200.
Reading the activity log
From the settings page, scroll to Recent Activity and click any row for full detail including the raw payload.
| Field | Description |
|---|---|
| Envelope ID | Docusign envelope identifier |
| Event Type | What triggered the webhook |
| Status | Processing result (Completed, Failed, Rejected) |
| HMAC Verified | Whether signature verification passed |
| Agreement ID | Linked Propper agreement (if matched/created) |
| Received At | When the webhook arrived |
Envelope status mapping
Agreement status in Propper follows the Docusign envelope status, not recipient status:
| Docusign Envelope Status | Propper Agreement Status |
|---|---|
created | CREATED |
sent | SENT |
delivered | DELIVERED |
completed | COMPLETED |
declined | DECLINED |
voided | VOIDED |
Recipient events track individual recipient progress and are stored separately — they give you granular visibility but do not change the agreement's final status.
Docusign retry behavior
With Require Acknowledgement enabled, Docusign waits up to ~100 seconds for an HTTP 200 before treating a delivery as failed, retries with exponential backoff, and logs every attempt in Docusign Admin → Connect → Logs.
Common issues
Nothing is arriving at all
| Check | Action |
|---|---|
| Is this historical data? | Envelopes signed before the configuration existed never arrive on their own — republish them |
| Configuration status | Ensure it shows Active in Docusign Admin ↗ |
| Address match | Confirm the URL in Docusign matches the one on your settings page exactly |
| Docusign logs | View delivery attempts in Docusign Admin → Connect → Logs |
| Response time | Very large payloads can exceed the 100-second window |
Agreements appear, but with no documents
| Check | Action |
|---|---|
| Include Documents | Must be ticked in Docusign Connect — this is the usual cause |
| Auto-Import | Must be enabled in Propper settings |
| Storage | Confirm your organization has available storage |
Events arrive but nothing is created
| Check | Action |
|---|---|
| Auto-Import | If off, events are recorded but no agreements are created |
| Verification method | Auto-Import reverts to off if neither HMAC nor Basic Auth is saved |
HMAC verification failing
| Check | Action |
|---|---|
| Secret mismatch | Copy and paste it fresh — check for whitespace |
| Validation method | Must validate raw bytes, not parsed JSON |
| Wrong secret | Header names are case-insensitive, so casing is never the cause — re-check the secret |
Migration playbook
Phase 1: Setup
- Confirm Connect is enabled on your Docusign plan
- Create the Connect key and configure a verification method in Propper
- Create the account-level Connect configuration in Docusign, with the permanent fields set correctly
- Enable Auto-Import
- Test with a single envelope, end to end, and confirm its document attached
Phase 2: Historical import
- Set the Publish date range to cover your full history
- Publish a small batch first and verify it
- Publish the remainder, in date-range batches
- Watch Recent Activity for failures
Phase 3: Verification
- Sample 5–10% of imported agreements
- Verify documents are attached correctly
- Confirm status mapping is accurate
Phase 4: Cutover
- Begin creating new agreements in Propper Sign
- Keep Docusign Connect active for any remaining Docusign envelopes
- Monitor both systems during the transition
API reference
Webhook endpoint
Your organization's webhook address is displayed on the DocuSign Connect settings page.
Headers:
| Header | Description |
|---|---|
X-DocuSign-Signature-1 | HMAC-SHA256 signature (if configured) |
Authorization | Basic auth credentials (if configured) |
Content-Type | application/json |
Response. Events are accepted and processed in the background, so the reply confirms receipt rather than the outcome of the import:
{
  "received": true,
  "requestId": "uuid",
  "success": true,
  "queued": true,
  "logId": "uuid",
  "queueMessageId": "string"
}
| Field | Description |
|---|---|
received | Always true if the webhook was accepted |
success | Whether the event was accepted for processing |
queued | true when the event was handed off for background processing |
logId | ID of the log entry — use it to check the processing status afterwards |
queueMessageId | Identifier for the queued event |
Because the event is processed after the reply is sent, this response cannot tell you whether an
agreement was created. Fields describing the imported agreement are absent whenever the event was
queued, so a caller that branches on them will always take the "missing" path. Check the outcome in
Recent Activity using logId instead.
Next Steps
Propper Documentation
- Migrating Your Integration from Docusign — moving your integration code
- Sign Webhooks — Propper's outgoing webhooks
- Templates — create signing templates
- Propper Dashboard — access your organization
Docusign Documentation ↗
- Docusign Connect Overview ↗ - Official Connect documentation
- JSON SIM Format ↗ - Webhook payload format reference
- Connect Configuration Guide ↗ - Step-by-step setup in Docusign Admin
- Publish Envelopes ↗ - Republish historical envelopes
- Connect Event Triggers ↗ - Complete list of events
- HMAC Security ↗ - HMAC signature verification